HelpDesk - Setup
The Helpdesk module is used to centrally enter, record, process and evaluate various user requests in the Microsoft Dynamics 365 Business Central system. Users can enter requests for service operations, for providing support, modifying or supplementing functionality, register complaints and so on. It also allows you to categorize requests, set priorities, and manage processing by assigned solvers. There is also a history of closed HelpDesk requests.
In order to enter requests into the HelpDesk, it is necessary to make some settings in advance:
- HelpDesk Setup.
- Create a number series for HelpDesk requirements.
- Create user categories.
- Enter authorized persons and assign them to categories.
- Populate the requirements priority table.
- Create request categories (optionally if they are tracked).
- Populate the table of ways to solve.
- Create a workflow template for the Helpdesk.
- Set up workflow for HelpDesk.
HelpDesk settings
- Choose the
 icon, enter Helpdesk Setup and then choose the related link.
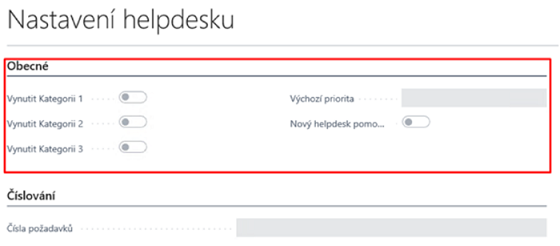
On the Helpdesk Settings page, on the General tab, you can choose whether to fill in request categories 1-3, the default priority, and whether you need to enter new requests using the wizard.

On the Numbering tab, in the Request Nos. field, select a number series for newly created Helpdesk requests.
Create a number series for HelpDesk requests
- Choose the
 icon, enter No. Series and then choose the related link.
 - On the Number Series page, click New to create a new number series.
- Enter the Code, Description, and Starting No. of the number sequence.
- Select the Default Nos. for autofilling numbers when entering new requests check box.
Example of a created number series:

Set up a User Categories
User categories are groups of users. User groups are assigned a certain weight (level of importance), which is one of the factors in the automatic request priority calculation The user category contains the Code, Description, and Weight fields
- Choose the
 icon, enter User Categories and then choose the related link.
 - On the User Category page, choose New action, and then enter Code, Description, and Weight.
- The Weight field can take values 0-1 in terms of percentages (0 = 0%, 1 = 100%).
Set up an Entitled Persons
For each Authorized Person, the appropriate User Category is selected, according to which the program automatically pre-populates the Request Weight for that person. The pre-filled value of the Weight field can be adjusted individually for each person. The program then uses this value to calculate the overall priority of the request.
- Choose the
 icon, enter Entitled Person List and then choose the related link.
 - A table will appear with all authorized persons entered so far.
- On the Entitled Person List choose the New action and fill in the new authorized person fields as needed.
On the Communication tab, you can add more detailed contact information for the given person (Address, Phone No., Fax, Mobile Phone No., E-mail).
When the corresponding login name of the authorized person is filled in the User ID field, the code of the authorized person who enters the request will be automatically offered to the HelpDesk when making a request.
The User Change Allowed field entitles you to change the Authorized Person (poIe Helpdesk Identification) when entering a new request into the HelpDesk. The selected Default priority will be automatically offered in the newly purchased request.
Request Priority Setup
In order to evaluate requirements according to their urgency, it is necessary to fill in Requirements Priorities:
- Choose the
 icon, enter Request Priorities and then choose the related link.
 - On the Request Priorities page, choose the New action.
- Enter the Code and Description fields.
- Enter the appropriate value in the Weight field to calculate the resulting request priority.
- The Weight field can take values 0-1 in terms of percentages (0 = 0%, 1 = 100%). Weights can be set arbitrarily, depending on local conditions and customs (usually, the more severe the requirement, the higher the weight).
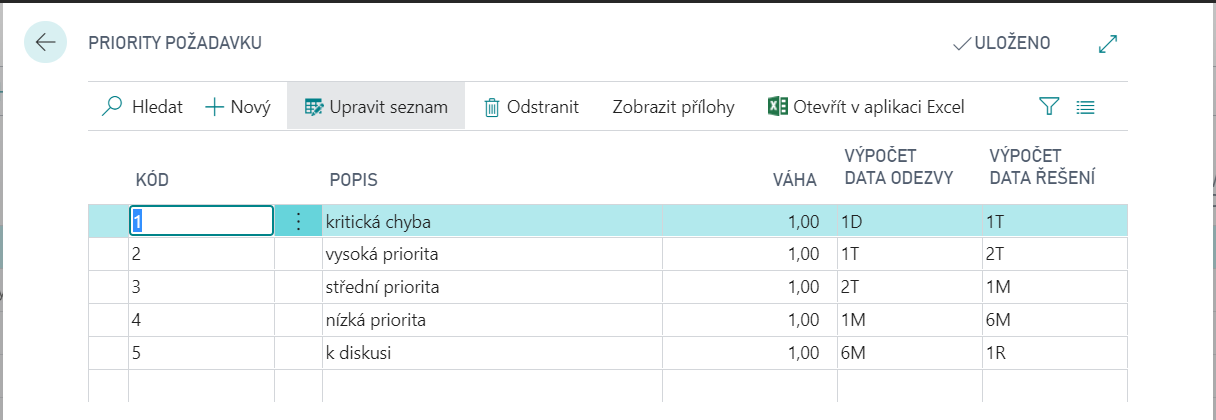
- Enter the Response Date Calculation, Solution Date Calculate using a formula to calculate fields.
- Integers can be entered in the fields with the abbreviation of the unit of time (e.g. D = day, M = month, Q = quarter, Y = year). The resulting date, when entering a new request, is calculated from the date when the request was entered (the date can then be edited).
After specifying request priorities, the table can look like this:

Request Category Settings
To monitor requirements from points of view other than severity, it is possible to define categories of requirements, up to 3 levels for which the tree decay applies (i.e. they are in a hierarchical subordination relationship, i.e. the Category 1 option determines which Category 2 will be offered, which in turn will affect the Category 3 offer).
Choose the
 icon, enter Request Categories and then choose the related link.
On the Request Categories 1 page, choose the New action.
Fill in the appropriate fields in the Category Code (max. 10 characters) and Description (max. 50 characters) rows.
To create multiple subcategories (level 2 categories) for a given category, choose Request Categories 2 action on the Request Categories 1 page.
Repeat steps 2 and 3 to complete Requirement Category 2.
To create multiple subcategories (level 3 categories) for a given category, choose Request Categories 3 action on the Request Categories 2 page.
Repeat steps 2 and 3 to complete Requirement Category 3.
Set up a Request Solution
In this setting, it is possible to define individual ways of solving requests.
- Choose the
 icon, enter Solutions and then choose the related link.
 - On the Solution page, choose the New action.
- Fill in the appropriate fields in the Code (max. 10 characters) and Description (max. 50 characters) rows.
Create a Status Management template for Helpdesk
To set up a workflow, the Status Management addon is required, which you must have installed.
Choose the
 icon, enter Status Management Templates and then choose the related link.
On the Status Management Templates page, fill in the fields in the Code, Description, and Table Number (52068298) rows.
In the function panels, click Status Management Statuses to set each state.
- For workflow status, you need to define Code, Description, and Next status filter, which determines what other states can be accessed from that state. One of the states must be marked as Default State – this is filled in when a new helpdesk request is created. Some states may be referred to as the Final Status, from which no further state is continued.
When you have defined Status Management Statuses, use the OK button to confirm them.
For more information about setting up and setting up Status Management, see Status Management Settings.
Status Management settings for HelpDesk
After you create a template, you must set up the template on the Status Management Settings page.
- Select the
 , enter Status Control Settings, and then select the related link.
 - On Status Management Setup page, in the Table number field, type the 52068298 number that indicates the Request Helpdesk table.
- In the Status Management templatesfield, select the appropriate template for status control for HelpDesk requests.