Parcels - Balikobot Integration
Update: 08.04.2022
The Parcels addon is used to create shipments and directly print labels of selected shipping angent, send shipment data to the shipping angent and order the actual parcel collection. With this extension, the process of processing and creating shipments sent to customers is accelerated. This addon uses the API of the Balikobot service.
This addon is built on the basis of reading barcode (numbers) of charged documents. Shipments can be created from posted sales shipments and invoices. If the user will create a shipment from an invoiced sales delivery, the shipment will be created without COD and from invoices with COD.
List of shipping angents:
- Airway
- Česká pošta
- Dachser
- DB Schenker
- DHL
- DHL DE
- DHL Freight
- DHL Freight Euroconnect
- DHL Parcel Europe
- DPD
- DSV
- Fedex
- Fofr
- Gebrüder Weiss CZ
- Gebrüder Weiss SK
- Geis
- GLS
- JAPO Transport
- Liftago
- Lockers.ai
- Magyar Posta
- Messenger
- Pošta Bez Hranic
- PPL
- Raben
- SK Parcel Service
- Slovenská pošta
- Spring
- TNT
- Top Trans
- UPS
- We Do
- We Do Uloženka
- Zásilkovna
Creating a sales order
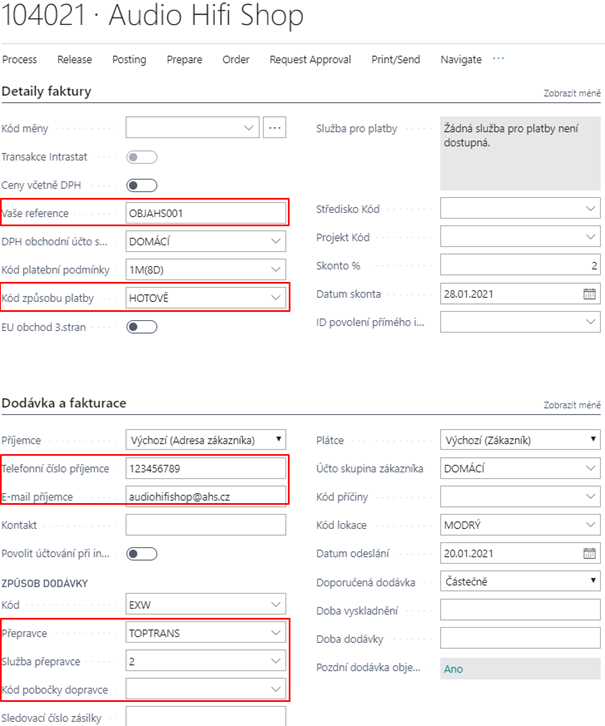
The basic step of the shipment creation process is the sales order. he data from the sales order is transferred to the other documents from which the shipments are created, so it is essential to enter the data correctly at the beginning of the process. (Similarly, shipments can be created from sales invoices.)

Required fields to be entered before issuing a document
- Customer address
- Shipping Agent Code, Shipping Angent Service Code or Shipping Angent Branch Code.
- Customer's phone number, email or one of the following.
- Payment method code (if COD), variable symbol.
- Your references (if your customer requires a label, e.g.: your order number).
Business Central will not release a receipt if the phone number and/or email is not filled in! (See check settings). If no shipping angent is selected on the order, the check to release the document (phone number and email is disabled).
Optional field to be entered before the document is released
The user can already enter optional shipment parameters in the sales order. The Shipment Parameters infomation panel on the sales order tab is used to enter them. The insert button opens a window with parameters from the settings, which can be added as required. These can be for example:
- Checking the age of the addressee
- Driver contact
- Delivery to the floor.
- Morning delivery.
- Checking the age of the addressee
- Driver contact
- Delivery to the floor.
- Morning delivery.
- And many more.
Create Parcel Card
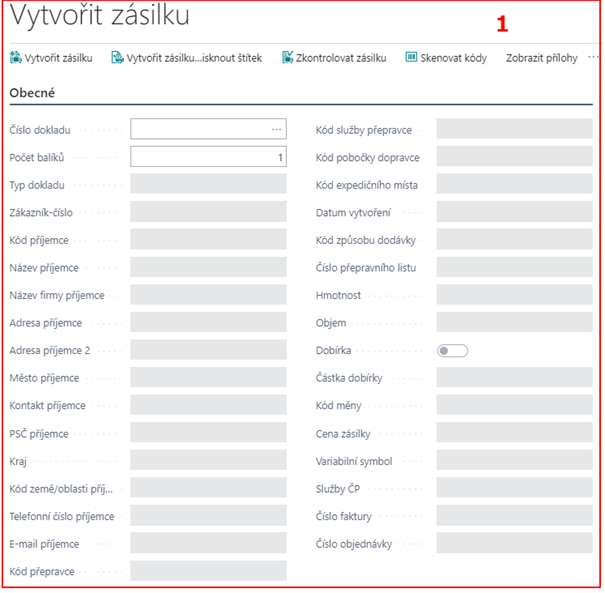
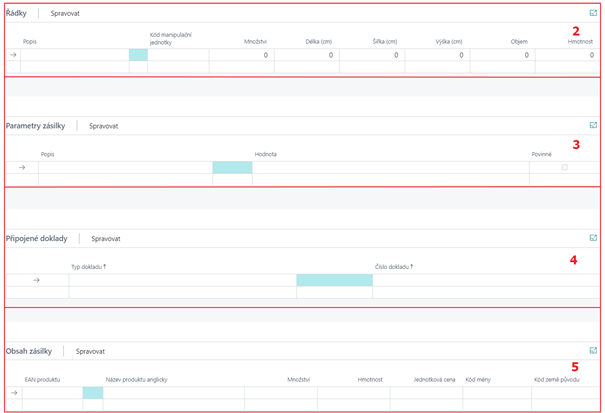
The consignment card consists of a total of five parts.


Parcel header
The document header contains only the mandatory data needed to create a shipment, to enter other data such as dimensions or a message to the driver, you must use the Shipment Parameters pane. Each shipping angent and shipping angent service has its own specific parameters that will report a message if the data is incomplete, indicating what data is missing from the shipment.
Parcel lines
The "Number of Packages" field exists to define the number of packages within a shipment. If the shipment is a parcel shipment (NOT a PALETTE shipment), once the number of parcels is entered, shipment lines will be created with individual shipping angent labels assigned. In the case of a pallet shipment, this field will specify the quantity of one handling unit (multiple lines will not be created, but one line will be created and the quantity will be filled in; e.g.: 3 pallets).
Other parts
| Part | Description |
|---|---|
| Shipment Parameters | Shipment Parameters Selectable. |
| Attached documents | In the Attached documents subpage it is possible to see all delivery notes or invoices that have been inserted in one shipment (only functional when the shipment is sent to one address). |
| Contents of shipment | The contents of a shipment are mainly for shipments outside the EU, where it is necessary to give information about what is in the shipment. |
| Parcel Attachments | Used to attach pdf documents to a shipment. |
Creating a new shipment from a posted document
After posting the shipment, the process of creating a shipment for the customer begins. One way is to create a shipment from a delivery note or a charged invoice. By retrieving the invoice number, the Create Parcel form is automatically pre-populated. This step eliminates the need for the user to manually fill out the shipment information.
- Choose the
 icon, enter Create Parcel and then choose the related link.
 - Enter the number of the document being charged (posted sales shipment, posted sales invoice) in the Document Number field. Or use the Scan Codes function (in case you have a barcode with a receipt number).
- The user has the option to enter the number of packages within a shipment.
- Select the Create Shipment and Print Label function.
- The shipment is now created and is also in the For collection status, i.e. it has already been assigned a number by the shipping agent. The label and data are on the Balikobot side).
Manual Parcel creation
You can also create shipments manually without accounting documents, e.g.: for sending letters or an additional package. On the shipment overview there is a "New" function which opens a blank shipment card. The Shipments tab and the Create Shipment tab are almost identical. When you manually create a shipment, you cannot scan the number of the billed document and the data must be filled in manually. In this creation, you must enter Status on "New" and add one line. Once the data for the shipment is set up, the "Add to Shipment" function will register the shipment in the Balikobot system. Then you must manually print the label.
To create a shipment manually, the steps are as follows:
- Select the New function on the shipment overview.
- Fill in the necessary fields for the shipper and its service.
- The Add to collection function (the shipment is in the For collection status and the label can be printed).
- Use the Print label function.
- The shipment is ready to be ordered for collection.
Shipment modification
You can edit shipments only if they are in the New status. If a shipment is in the Collected state, it can no longer be edited. In order to edit/delete shipment information, the shipment must be in the For Collection status. Use the Remove From Shipment function to change the status from For Collection to New.
After this step, you must notify the shipper that you are deleting or editing the shipment. At this point, the shipment number is removed from the carrier and the label is deleted. Once the data has been edited, the user will use the For Collection function and use the Print Labels function to print the new label.
- Choose the
 icon, enter Parcels and then choose the related link.
 - Choose on the consignment line and use the Remove from collection function.
- Open the Parcel (it now has a status of New).
- Add data/values about the shipment (change of carrier, number of packages, weight, dimensions...).
- Use the Add to collection function (the shipment is in the For collection status and the label can be printed).
- Next, use the Print Label.
- The shipment is ready for Order Collection.
Ordering Collection
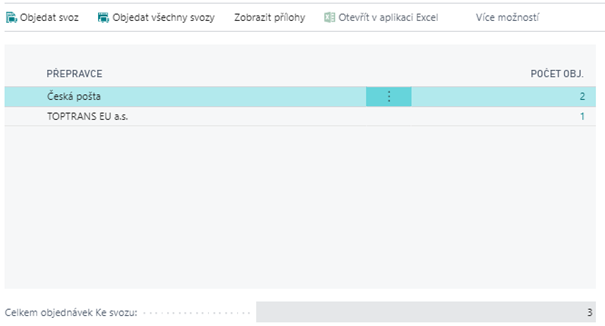
Order collection is used to pass information about your shipments to the carrier. The process of ordering a collection is simple, it is done using the "Order collection" function on the shipment overview.
The function will display a list of carriers with the number of shipments that have not yet been ordered for collection. The user can order a collection only for the selected shipper or for all of them at once.

In order to order a collection, the following steps are required:
- In the shipment overview, select the Order Collection function.
- On the Order Pickup tab, select whether to order a pickup from one carrier (Order Collection) or all carriers (Order All Collections).
- When the function is initiated, the Handover report will print.
Printing the collection report
The handover report is generated by the haulers. This report can be set to print automatically when a collection is ordered. The automatic printing settings are in the Shipment Settings window. For additional printing of the handover report of the selected shipper, there is a function with the same name on the shipment report, where you just stand on one of the shipments of that shipper on the day of the collection. A list of all shipments from the selected shipper for the specified day will then be printed.
For an additional printout of the collection handover report:
- Stand on the shipments from that collection and use the Collection Handover Protocol function.
- This will open a PDF file, which will then be printed from the browser window.
Package Tracking
In the shipment overview you can see at a glance the status of the shipment. This status is not structured and is only informative without detail. To update this status on the shipment line, use the Update Track Status button.
If you want to view individual shipment statuses from the shipper, use the Track Status function on the shipment overview to open the individual shipment status page.
![]()
Controls and restrictions
- If the Shipping agent Code and Shipping agent Service Code fields are filled out on the sales order, you must enter the recipient's phone number and email. If the fields are not filled in the receipt cannot be released.
- When entering data on the shipment card (automatically by retrieving codes or manually) there is a Check Data function on the shipment card. After running it, you will be informed if the information transmitted is correct.
- One shipping point can be assigned to one location. A 1:1 relationship is created.
Account information and checking of valid carriers
To check your prepaid carriers, we have implemented the WHOIAM method, which lists information about your API connection and a list of active carriers.
To verify your account as a test or production account and to list the carriers, proceed as follows: <Překladač Microsoft Translator>
- Choose the
 icon, enter Shipping Agents and then choose the related link.
 - Select one of your carriers and click On Connection Test function
- After verifying your account, the message Service connection successful. will pop up and you'll see information about your account and Active Carriers.
- You can then close the window.
Paperless Trade
Paperless Trade is used to send an electronic invoice (in the case of a pro-forma Invoice) for a customs procedure encoded in PDF BASE64.
In the Parcels addon, you can use the function to automatically create and attach a PDF invoice to a shipment, provided that the shipment is created from a billed sales invoice. If you create a shipment from a posted sales shipment, you must insert the PDF manually.
Create a shipment from a posted sales invoice
A prerequisite for use is the correct setting of Paperless trade.
- Choose the
 icon, enter Parcels and then choose the related link.
 - Use the Create Shipmentfeature in your shipment list.
- Enter the number of the posted sales invoice.
- The system automatically generates PDF invoices and attaches them to the shipment.
- Use Create a Shipment or Create a Shipment and Print a Label
- Continue processing the next shipment or close the form.
Create a shipment from a posted sales shipment
- Choose the
 icon, enter Parcels and then choose the related link.
 - Use the Create Shipmentfeature in your shipment list.
- Enter the number of posted sales shipment
- The system automatically fills in the data for the shipment.
- On the Shipment Attachments tab click in the line and attach the previously manually generated PDF (pro-form invoice).
- Use Create a Shipment or Create a Shipment and Print a Label
- Continue processing the next shipment or close the form.
Availability of Balíkobot services
Balíkobot also offers the possibility to view the status of individual service availability at https://status.balikobot.cz/.
There is also the possibility of notifications from Balíkobot either by e-mail, via teams, RSS and others.
See also
Setup - Parcels - Balíkobot Integration
Productivity Pack
ARICOMA Solution